Object#
When you open Blender or make a new file, you will see things already in the viewport: a cube(a.k.a the default cube), a point light, and a camera. These are all Objects in Blender, therefore they have some common properties. To interact with objects in the 3D viewport, check the header and make sure it is in Object Mode.
Adding an object#
Click Add on the header or press Shift + A to bring up the Add menu, then choose the object you want to add to the scene. A menu will show up in the bottom left corner, allowing you to tweak the shape you just added. This menu will disappear and will not show up again after any other operation.
Tip
The mesh/curve objects you are able to add this way are refered as Primitive.
The object will appear at the position of the 3D Cursor, which is the thing you can see in the viewport that looks like a life preserver but is way too thin to save anybody. To move it, hold Shift and Right Mouse Click, or press Shift + S and choose the option you want on the radial menu.
Outliner and Collection#
The Outliner area is on the top right by default, and it lists all the objects in the scene. Left Mouse Click on the little triangle reveals the data linked to the object. You can also rename your object by double-clicking its name. Collection is a tool to organize your objects, you can make new ones by Right Mouse Click and choosing New Collection in the menu. To move an object into the new collection, hold Left Mouse Button on it and drag it there.
Toolbar#
The Toolbar contains tools represented as icons on the left part of an area, its contents depend on the type of the area and the mode the area is in. Left Mouse Click to select a tool, and for the tools with a small triangle at the bottom right corner, you can hold Left Mouse Button to choose a variant.
Tip
You can hide the Toolbar by dragging its right border to the left. To undo that, drag the > to the right.
Origin#
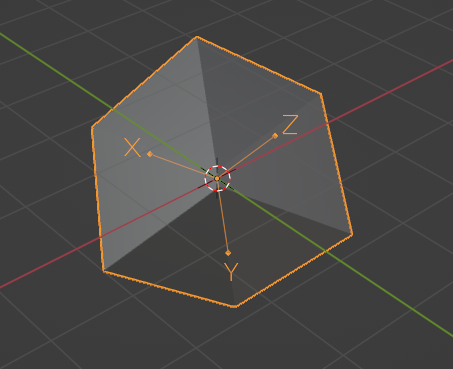
Every object has an Origin point, and the point is displayed as a small orange dot when the object is selected. The origin decides the position of the object, and object rotation and scaling are calculated with respect to this point.
Global and Local axes#
The red, green, and blue (not always shown by default) lines displayed on the viewport represent X, Y, and Z axis respectively. These are called Global Axes and they are for the global space we have been working with so far. Besides that, all objects have their own Local Axes, and you can check that by ticking Object Properties > Viewport Display > Show axes in the Properties area (at the bottom right by default).
Object tools#
Tip
If you can’t find where a tool is, you can always press F3 to search for it.
By default, Left Mouse Click selects an object (in the 3D viewport or the outliner), and the selected object should have a bright orange border. To select multiple objects, hold down Shift and Left Mouse Click or hold Left Mouse Button and drag to use Box Selection. The last selected object will be the Active Object, with a bright orange border, and the others in dark orange. To deselect an object, hold Shift and Left Mouse Click on a selected object, or just Left Mouse Click on empty space to deselect all. Blender offers various tools for selection, you can access them using the Select menu on the header.
Press G or use the Move tool in the toolbar to move an object. Like most operations in Blender, Left Mouse Click to confirm and Right Mouse Click to cancel the change. To snap the object to the grid, Left Mouse Click the magnet icon on the header to turn it on or hold Ctrl to use it temporarily. If you want the object to move strictly on a certain axis, press X, Y, or Z to lock movement on the respective global axis, or press twice for local axes. Alternatively, press Shift + X, Shift + Y, or Shift + Z to lock the movement on the other two axes. To make finer adjustments, holding Shift lets you move much slower. Last but not least, if you want the object to be in an exact location, open the sidebar and fill in the coordinates on the Item tab.
Press R or use the Rotate tool in the Toolbar to rotate an object, Left Mouse Click to confirm and Right Mouse Click to discard the change. By default, the object rotates around an axis perpendicular to the view, but you can press X, Y, or Z to change the rotation axis to the respective global axis, or press twice for local axes. To have more precise control, holding down Ctrl lets you rotate by 5-degree increments and Ctrl + Shift by 1 degree. An alternative free rotation mode, Trackball Rotation can be accessed by double pressing R. You can also input the exact angles you want on the Item tab in the sidebar.
Tip
For all tools that allows you to adjust the effect by moving you cursor (rotation, scaling, etc.), put your cursor away from the center of the screen before activating them will give you finer control.
The pivot point of the rotation is determined by the choice of Transform Pivot Point and you can change it using the second dropdown menu located in the middle of the header.
To scale up or down a mesh object, press S or use the Scale tool in the toolbar, Left Mouse Click to confirm and Right Mouse Click to cancel the change. Hold Ctrl to scale by 0.1x increments and Ctrl + Shift by 0.01x. To scale along a certain axis, press X, Y, or Z for the respective global axis or twice for the local one. Scaling is relative to the pivot point, check the Rotate tab if you want to know how to change it.
To copy an object, select it and press Shift + D. This operation will copy the object and activate Move tool (see Move tab for the details) for the duplicate. Alternatively, you can Right Mouse Click to bring up the Object Context Menu and use the Copy Objects and Paste Objects there.
Tip
Trasformations, like moving, rotating, and scaling, are not shared because they are on the object level.
Another kind of duplication is called Linked copy, the copy will share the same mesh data with the original object. As a result, any alteration to the mesh will be shared between the two objects. To do it, select an object and press Alt + D or choose Duplicate Linked in the Object Context Menu.
When you are working on an object with multiple other objects in the same scene, you may find your view obstructed. To hide an object in the viewport, select it and press H or Left Mouse Click the eye icon in the outliner. To undo it, Left Mouse Click the closed eye icon in the outliner, or press Alt + H to unhide all objects in the scene. Another option is to use Local View to hide all but the selected object, press / to enter the view and press it again to exit.
For mesh objects, press Alt + H or use Object > join on the header to merge all the selected into the active object.
In Blender, the concept of Parent is like ducklings following their mother, not the scary and stressful kind. Select multiple mesh objects, and make sure the active object is the one you want to be the parent, then press Ctrl + P or Right Mouse Click to bring up the object context menu and choose Parent > Object. The transformation (location, rotation, scale) of the parent object will affect the child objects, but not the other way around. To clear parenting, select the child object and Alt + P or choose Parent > Clear Parent in the object context menu.
To delete an object, select it then press X and confirm or Right Mouse Click to bring up the object context menu and choose Delete.
Shade Smooth is a feature to make low poly models look smooth without changing geometry. It works by linearly interpolating normals(see next section) to mimic a perfectly smooth surface. To turn it on, select the mesh object and Right Mouse Click to open the Object Context Menu, then select Shade Smooth.
For certain objects, you may want to preserve some sharp edges instead of smooth-shading the entire surface. In that case, choose Shade Auto Smooth and adjust the Angle to get the desired effect. If you want more control over which edge should not be smoothed, select the edges in Edit Mode(see next section) then Right Mouse Click and select Mark Sharp.